Thursday, June 30, 2011

The (almost) $0 bathroom makeover - Day 7

I've been working on refacing the cabinets.  I went back and forth on color and ideas, but finally decided to stick with what we have, only age them a bit and give them a bit of a stain/glaze.

I have some stain for our exterior that will work nicely so I pulled off all the hardware and sanded off the paint on the edges and bits that stick up.


Next, I slathered on a layer of stain.


Once the stain covers the door, wipe it off using a dry towel or rag.  Stain will stick to the sanded off bits and in the corners, giving the doors a nice aged look.


I still don't have a final decision on the hardware.  I have some that turned up in the garage, but they don't really go with my aged cabinets now.  I may have to actually purchase something.. aaaahhhh... Tune in next time... for Hardware Wars.... (that's not mine btw, but it's a funny spoof... )
http://video.google.com/videoplay?docid=-9059800655908790019

Good times, good times.
OH.. and hopefully I'll have new batteries for the camera soon so the picture quality will be better.  Had to use the camera on the phone.

The (almost) $0 bathroom makeover - Days 3 - 6

CLEAN , PREP, PAINT
I cleaned the bathroom and got most of the kids things out of the way. This is the part where things get exciting, but don't skip any steps! TAPE TAPE TAPE to paint, or if you're really good, cut in all your corners and edges. I took all the doors off of the cabinets and the drawers and fake drawer faces are all out and off.

Imixed up a nice color using two of my no VOC paint colors from previous room paintings and cut in all my edges and corners.  I taped around the mirrors... just so I could get in behind them.  They're very difficult to remove.  I also taped around my light fixtures since removing them was tough as well.

We're looking good!  And so far, our spend is ZERO!


Next up is refacing our cabinets.

Wednesday, June 15, 2011

The (almost) $0 bathroom makeover - Day 2

INSPIRATION


I've been thinking about how I'd like the "kid's bathroom" to be fun but still beautiful, and something they can grow up in.  It will also have to be very undefined, not too femine or masculine - gender neutral.  So many gorgeous things were available to look at online, but here are a few of the more fun ideas with some of the colors I have available in my free leftover paint and I do have some boards and old MDF so I'm excited at the prospect of interpreting and implementing these ideas in my own way.

Tomorrow - we prep!!!

Monday, June 13, 2011

The (almost) $0 bathroom makeover.

Day 1.

BEFORE - Scavenge and Inspire

Here are the before pictures of the bathroom.  I'm going to keep with the sea theme of the shower curtain, but I'm going to age it a bit.  Most of the kids are older and this way, I only have to change the shower curtain, and not today.  :)


So aside from the messy kids, you can see most of the bathroom is pretty boring with a very dated yellow counter top.  I'm going to try to work with that.  Right now, there's a very old tile floor in the area with the bath and we're down to the plywood subfloor in the bathroom - painted a nice dirt brown to hide the mess and coated in a few coats of polyurethane to protect it from moisture.

Scavenging around I found the following materials to get me started.

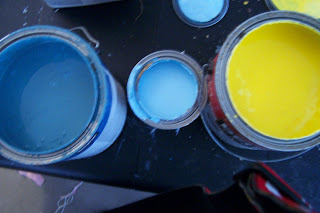
Three different shades of blue/turquoise (one isn't shown) and a nice bright yellow.  I also have a brown that I'm thinking of using.


These tiles were left by the previous homeowner and match the tiles in our bathroom and the kitchen.  They would be good in the sink area of the bathroom.  They also left behind some vinyl "wood" sticky tiles.  Since this is a temporary flooring fix, I'm going to lay these in the bath area, and then reseal the bathtub and toilet.

This is left over MDF from some project or another.  I'm thinking these will be useful for shelves.. although.. I believe I also have some old solid wood shelves tucked away upstaires.  I may use those instead, or, I may use old fence boards and stain them for a more rustic sea side feel.

Coming up, some drawings or at least some images for inspiration!!

Wednesday, June 1, 2011

Parisian on the cheap

Here is the dresser that started it all.
 
It costs about $800 bucks.  As much as I like it, I didn't want to spend $800 dollars. 
Time to get creative.  I had a couple of these IKEA Stranda Dressers.  So I took one and decided to give it a makeover.  These cost about $150 at Ikea.


 I cut 4 half figure eight panels out of 3/4 inch plywood and attached them to the sides of the dressers using 2x2's and screws.  These go on both sides, front and back. 


After I attached the panels to the dresser I enclosed the sides with bendable MDF.  The MDF followed the curves and cost me about $60.
(Yay Rockler).


Finally, I filled in the holes and edges with woodfiller, sanded and painted. The finished product looks like this. 


I used Ralph Lauren Metallic paints.  They were more expensive than regular paint, but I wanted that pewter type finish.  I spent about $60.  So about $60 for paint and another 30 for the hardware. 

My grand total for the dresser was right at $320.00 dollars.